Showing posts with label Tag. Show all posts
Saturday, 12 March 2016
A Couple of Tags to Share
Thank you for your kind comments on my last post. Seems the world loves a nerd :D
Anyway, not one tag to share today. Oh no! Can you believe I have two???
Both use the same silicone mould of a male torso from FPC Sugarcraft. One of my creative play times was to grab a pile of the moulds I've accumulated over the years and slap some clay into them. So now I have a small box full with clay pieces waiting to be painted and used.
The above tag was me playing around with texture paste. Plus I'd just bought some bright pink paint which I wanted to try out.
The other tag found me playing around with gluing wrinkled tissue to the background and painting over it. Looked brilliant so I covered the majority of it with an embossed card which I inked up with orange. Go figure.
Now off to have a think about how to use the rest of my moulded embellishments.
Tuesday, 8 March 2016
Take Three Things Challenge
There's a new blog in town, the Creative Carte Blanche and they hold a monthly challenge. I missed out on their first but I like the idea behind the latest. To use three elements which, they state, normally don't go together. These are, corrugated card, lace and metal.
Now that's the kind of challenge I can dig my teeth into. Making art work, when it shouldn't.
I took a white die cut tag, and added blue Colour Burst from Ken Oliver. I added more blue with a selection of distress inks and blending tool. The flower was made by die cutting the flower pieces from corrugated card and colouring with acrylic paint. I took a selection of Seth Apter's stamps and added to the flower pieces with black Archival ink.
I attached the metal tassels to the flower and glued the whole thing to my tag. I spritzed a piece of lace with Dylusions spray and once dry, glued to the bottom. I added the label and dotted a line of black Nuvo Crystal Drops to finish it off.
And yes, I know my blog has taken a quieter turn recently. The reason being is that I have been quietly creative and playing with all sorts of mixed media stash. And because I'm mucking about and trying out new ideas and techniques which I'm rusty with, the results have been...well...how can I put it...not "blog-worthy". There's a vast chasm of difference between the ideas in my head and the finished pieces.
However, they are all valuable, in that I'm learning more each time. The endless cursing and bad language heard from my craft room is not in vain.
Time will come, when I produce something which I'll be pleased to photograph and share lol. In the meantime, I'm having a lot of fun just messing about :D
Friday, 22 March 2013
Red Tag
Just playing around, wanting to cut, paste and make something. I thought I'd experiment with darker colours but still keeping with my style. If I was to make it again, I think I'd add some stitching around the tag and perhaps distress up the edges more. However, as a first attempt, it hasn't turned out too bad.
Now I just need to adapt and tweak my photography skills as well. I'm too used to the lighter colours.
Keeping it short today. So until next time.
Pxx
Now I just need to adapt and tweak my photography skills as well. I'm too used to the lighter colours.
Keeping it short today. So until next time.
Pxx
Saturday, 25 August 2012
A little Gesso with a Smidge of Inspiration
Thank you for your kind comments yesterday and for persevering with the word verification. I really do appreciate how awful it is and will eventually switch back. Thank you also for your equally sweet remarks regards the drawing/sketch of the zombie fella. To answer your question Kory, and anyone else who is interested, I draw a rough outline in pencil first, then ink in with a fine black Uniball or Pitt Pen. It's all analog and no iPads.
Okay, onto today's tag. Yup, I seem to have my mojo in full swing, thanks to tags. As I've written before, I find them perfect for discovering all manner of techniques and creative experimentation and, for a change, I'm not fighting it, I'm going with the flow.
In a change to my usual format of just showing the end result, knowing the idea I wanted to put into practice, I took a couple of "before" pictures as well.
I mentioned in my previous post that I fancied doing something more along the mixed media direction. So I grabbed a tag and then, with very little conscious thought, just reached out for an assortment of textural elements which I hoped could be married together in an interesting assemblage. Above is the result.
I removed the flowers and glued everything else down with either PVA or glue gun. When dry, I coated the whole tag in white gesso, adding thicker clumps here and there to create more texture.
Once the gesso dried, the fun began. I merrily squirted a couple of ink sprays about and randomly dabbed on acrylic paints, dry brushing to highlight the textures. I did the same to the flowers and leaves, which were set to one side. Everything was then left to dry before being attached with a glue gun, resulting in this...
Which I have to say I'm quite pleased with. Okay, the colours aren't quite there yet. I still need to play around with more combos. But it's a good start.
Pxx
Okay, onto today's tag. Yup, I seem to have my mojo in full swing, thanks to tags. As I've written before, I find them perfect for discovering all manner of techniques and creative experimentation and, for a change, I'm not fighting it, I'm going with the flow.
In a change to my usual format of just showing the end result, knowing the idea I wanted to put into practice, I took a couple of "before" pictures as well.
I mentioned in my previous post that I fancied doing something more along the mixed media direction. So I grabbed a tag and then, with very little conscious thought, just reached out for an assortment of textural elements which I hoped could be married together in an interesting assemblage. Above is the result.
I removed the flowers and glued everything else down with either PVA or glue gun. When dry, I coated the whole tag in white gesso, adding thicker clumps here and there to create more texture.
Once the gesso dried, the fun began. I merrily squirted a couple of ink sprays about and randomly dabbed on acrylic paints, dry brushing to highlight the textures. I did the same to the flowers and leaves, which were set to one side. Everything was then left to dry before being attached with a glue gun, resulting in this...
Which I have to say I'm quite pleased with. Okay, the colours aren't quite there yet. I still need to play around with more combos. But it's a good start.
Pxx
Friday, 24 August 2012
Going Over to the Dark Side
First of all, I apologise in advance to all you wonderful peeps who take the time to leave me a comment. I've only gone and made the job harder for you. I've just switched on the dreadful word verification option. How do I know it's dreadful? Because nine times out of ten, even my eyes struggle to work out the chuffin' word they generate. However, in the last week, an increased quantity of anonymous spam has been flooding in. I'm obviously now on some automatic software's program. So in an effort to thwart them, I'm going onto word verification for a couple of weeks, then I'll remove it and see if I've shaken them off. Normal service will be resumed shortly, as they say.
Away from the frustrations of the digital world, I've dug out yet another tag to have a play with. And I've gone over to the darker side with this one. Muddy browns and dark greys dominate.
I drew (or rather scribbled) a zombie-style character, printed him out and coloured him in. Some of the ink ran whilst doing this but it rather added to the effect so I left it.
I spritzed the tag with brown and black inks before stamping along the left edge with black distress ink and using a wet tissue to soak up and blur the detail. I took my versatile white spray from Studio Calico and added some dripped spots and that was the background completed.
I cut out the little fella, glued him in place and went to my Evernote file on the computer to look for a suitable quote. Once found, I typed it into a text document, printed it out and inked it up with Old Paper distress ink. I stuck these on, added a few more scribbles with black pen and voila.
And what of the quest for my creative direction? In the words of the immortal U2 song, I still haven't found what I'm looking for. But I'm feeling ever closer with each experimental tag I make. Hopefully, the more I play, the sooner something will emerge that I'll go full gusto for. I want more texture, more dimension, more mixed media. Maybe with the next tag...
In the meantime, a bank holiday looms and no doubt the traditional downpour of rain to go with it. So whatever your plans for the weekend, I hope they are fun, relaxed and full of creative flair.
Pxx
Away from the frustrations of the digital world, I've dug out yet another tag to have a play with. And I've gone over to the darker side with this one. Muddy browns and dark greys dominate.
I drew (or rather scribbled) a zombie-style character, printed him out and coloured him in. Some of the ink ran whilst doing this but it rather added to the effect so I left it.
I spritzed the tag with brown and black inks before stamping along the left edge with black distress ink and using a wet tissue to soak up and blur the detail. I took my versatile white spray from Studio Calico and added some dripped spots and that was the background completed.
I cut out the little fella, glued him in place and went to my Evernote file on the computer to look for a suitable quote. Once found, I typed it into a text document, printed it out and inked it up with Old Paper distress ink. I stuck these on, added a few more scribbles with black pen and voila.
And what of the quest for my creative direction? In the words of the immortal U2 song, I still haven't found what I'm looking for. But I'm feeling ever closer with each experimental tag I make. Hopefully, the more I play, the sooner something will emerge that I'll go full gusto for. I want more texture, more dimension, more mixed media. Maybe with the next tag...
In the meantime, a bank holiday looms and no doubt the traditional downpour of rain to go with it. So whatever your plans for the weekend, I hope they are fun, relaxed and full of creative flair.
Pxx
Sunday, 19 August 2012
Another Tag, Another Doodle (with a difference)
In my quest to keep playing and experimenting as often as I can, I sat down this afternoon and pulled out one of my pre-cut white tags. Yes, it's been doodled upon once more but this time, ever so slightly differently. This time, I incorporated a stencil. Specifically a leaf stencil by That Special Touch.
I sprayed the tag with a mix of Mister Hueys and Dylusions colours before swiping a couple of the edges with distress stain. I laid the stencil over the top once dried with a heat gun and inked the outline of the stencil. I then, quite hamfistedly added some shading to the leaves and doodle within the gaps. I took a grey Promarker and filled the spaces inside the leaves. I added a frame around the tag with a black marker to add the finishing touch and that is as easy as it gets.
Hope you have all enjoyed your weekend and managed to sneak some creativity in. The visit from the Aunt-in-Law went well, though I politely ducked out after dinner (& yes the lamb was gorgeous) given that she really wanted to chat to Nick & it was all about family members whom I had no clue about.
Off to relax now in a hot bath ( I always seem to be blogging before a bath) with gentle music playing in the background.
Pxx
I sprayed the tag with a mix of Mister Hueys and Dylusions colours before swiping a couple of the edges with distress stain. I laid the stencil over the top once dried with a heat gun and inked the outline of the stencil. I then, quite hamfistedly added some shading to the leaves and doodle within the gaps. I took a grey Promarker and filled the spaces inside the leaves. I added a frame around the tag with a black marker to add the finishing touch and that is as easy as it gets.
Hope you have all enjoyed your weekend and managed to sneak some creativity in. The visit from the Aunt-in-Law went well, though I politely ducked out after dinner (& yes the lamb was gorgeous) given that she really wanted to chat to Nick & it was all about family members whom I had no clue about.
Off to relax now in a hot bath ( I always seem to be blogging before a bath) with gentle music playing in the background.
Pxx
Friday, 17 August 2012
Colourful Finds and Colourful Tags
I'm much more at home, playing around on tags it seems. I decided to try adding colour to a doodle this time around. So much easier to try out on a smaller scale than a journal page. And whatever seems to work, I'll go along with.
The word "Equipoise" is a new one on me. It means (if, like me, you didn't know) - "Equality in distribution, as of weight, relationship, or emotional forces".
I came across it by going onto the internet, finding a word generating site and requesting it come up with one. The general idea, especially for brainstorming/creative purposes is to go with whatever word comes up, whether you like it or not. However, I didn't like it and pressed the generate word button again. In fact I must have seen about 20 random words before this one came up.
Armed with my word, I wrote the block lettering first and then doodled around them. I added colour with copic markers and well, that's all there is to tell.
Interestingly, I made a little discovery yesterday. As I was putting the empty cans and bottles into the recycling bin at the side of our house, I saw on the ground, that Nick had left a box of card and paper next to the paper bin. It was a bunch of stuff from where he works and in amongst the Amazon packaging (of which Nick & I accrue way too much), there were these...
...100 large red tags. I knew instantly that these needed to be rescued and stored in the proper place i.e. my craft room. They're printed on one side (which can be covered with gesso, collaged paper or paint etc) and blank on the reverse. I'm so used to playing around with white and occasionally manilla tags but never red and I love that they're colourfully different. I mean, wouldn't you rescue them if you saw them too? Of course you would :)
Right, off to prepare for a visit from an Aunt. One of Nick's, whom I haven't met before. All I've been told about her is that she's an intellectual sort, which is a deliberately nebulous remark. Whether I'm to interpret it as that she's fun to be around or not, I'm unsure. But I'll be on my best behaviour and the house will be cleared of dust, regardless. Besides lamb is on the menu tonight, so I'll be a happy camper.
Enjoy the weekend folks
Pxx
Thursday, 16 August 2012
You Can Draw on Tags Apparently
Yes, you know it's never before occurred to me that I could simply draw on a tag. Don't ask me why but in my head, I see tags as foundations for adding layers of embellishment onto. Paint, stamp, glue and ink, yes. But the idea of just taking a pen to it, never popped into my wee brain.
So I thought I'd give it a go last night. For starters, you don't need an awful lot to crack on. One tag and a handful of black pens of varying thicknesses.
The rest, well, is up to imagination and inspiration. There is, blissfully, no planning involved and no fixed design idea in my head. I drew a rectangle (albeit a bit wonky) Then swirled some lines within it, creating blocks of space and continued to add doodled patterns within these random shapes.
As a final touch, I added grey with a fleximarker within the design and champagne outside the box.
I'm beginning to remember how useful tags are for experimenting with now. I've been struggling with art journals to explore using different materials, when these have been staring me in the face all the time. It's how I explored the pale, shabby chic style before I started to incorporate it into other crafts.
So I've cut myself a pile of tags and will endeavour to decorate them and play and experiment. Their diminutive size is ideal, as is their lack of purpose. And I don't mean that in a derogatory sense. Cards, journals, ATCs, scrapbook pages, they all have an end in mind. But a blank tag just has to be decorated. In any way, with anything. And if it goes really bad, it can easily be chucked in the rubbish bin and made afresh.
Ahhhhhh. Perfect! Px
So I thought I'd give it a go last night. For starters, you don't need an awful lot to crack on. One tag and a handful of black pens of varying thicknesses.
The rest, well, is up to imagination and inspiration. There is, blissfully, no planning involved and no fixed design idea in my head. I drew a rectangle (albeit a bit wonky) Then swirled some lines within it, creating blocks of space and continued to add doodled patterns within these random shapes.
As a final touch, I added grey with a fleximarker within the design and champagne outside the box.
I'm beginning to remember how useful tags are for experimenting with now. I've been struggling with art journals to explore using different materials, when these have been staring me in the face all the time. It's how I explored the pale, shabby chic style before I started to incorporate it into other crafts.
So I've cut myself a pile of tags and will endeavour to decorate them and play and experiment. Their diminutive size is ideal, as is their lack of purpose. And I don't mean that in a derogatory sense. Cards, journals, ATCs, scrapbook pages, they all have an end in mind. But a blank tag just has to be decorated. In any way, with anything. And if it goes really bad, it can easily be chucked in the rubbish bin and made afresh.
Ahhhhhh. Perfect! Px
Wednesday, 4 July 2012
Bon Voyage
Yes it's been a little quiet here recently. Last week I had man-flu which I desperately tried to hurry along to leave my system so that I could attend a 50th birthday celebration at the quaint, newly restored, vintage-styled Plaza Cinema in Stockport. The whole place had been rented out to the birthday boy and guests for the evening.
After being welcomed along a red carpet to the entrance, we were entertained by an organ recital and a couple of vintage short films. Then it was up the stairs to a lavish spread and an open bar till the early hours. Cake was served, speeches were made and all had a great time. I had a chance to meet up with friends whom I haven't seen in years. As much fun as it was though, I was still the first one to leave the bash. All the medication inside of me couldn't keep me awake. Good job it was just a few minutes walk home.
However, if you live locally and fancy a retro-themed evening I can highly recommend it.
Colds and work has meant that my crafting and drawing have slipped by the way though. Now that I'm over the pesky bug, I have to organise and prepare for our annual vacation. Yes, France beckons once again. But I didn't want to go and just leave my little space on the web for all that time. So I've cobbled together a quick tag to show.
A scribbled character which I drew, was scanned into photoshop and printed out. I coloured him in, cut him out and stuck him onto a background which I spritzed with green dyes and stamped over. An assortment of embellishments was added and fibres tied in a bow at the top. Nice & easy.
So I'm afraid there'll be no activity on here for a few weeks. But I'll be fully rested and no doubt raring to go with new, creative ideas on my return.
Looking forward to catching up with all your creative blogs soon.
Pxx
However, if you live locally and fancy a retro-themed evening I can highly recommend it.
Colds and work has meant that my crafting and drawing have slipped by the way though. Now that I'm over the pesky bug, I have to organise and prepare for our annual vacation. Yes, France beckons once again. But I didn't want to go and just leave my little space on the web for all that time. So I've cobbled together a quick tag to show.
A scribbled character which I drew, was scanned into photoshop and printed out. I coloured him in, cut him out and stuck him onto a background which I spritzed with green dyes and stamped over. An assortment of embellishments was added and fibres tied in a bow at the top. Nice & easy.
So I'm afraid there'll be no activity on here for a few weeks. But I'll be fully rested and no doubt raring to go with new, creative ideas on my return.
Looking forward to catching up with all your creative blogs soon.
Pxx
Thursday, 24 May 2012
Burlap Flowers & Chippy Fairies
Well I'm back from London & I survived. It was definitely a novel experience, fighting my way through the minefield of tourists but it was fun. And I came back laden with art supplies, tea, french cheeses and some rather heavy sausage.
And it's been a great week so far. The UK has been enjoying the rare sighting of the sun. Yes, even Manchester's constant rain has been put on hold. It's been so tranquil to sit in the garden and draw or listen to a play whilst sipping on smokey Earl Grey.
Trouble is, I haven't felt like sitting indoors, in my craft room playing and it was beginning to look as if I was going to have nothing to blog this week. However, I was up bright and early this morning and had already notched up a couple of hours worktime, so decided to drag out my stash and just spend a few minutes putting something together.
Almost everything is from Jodie Lee's Nature Collection, except for the burlap flower. I found this neat tutorial here. You need to scroll down to the last flower made, the Button-Eyed Daisy. I love how the burlap frays as you make it and you end up with these tattered strands. And I know I always say this but honestly it's really easy to make.
Right, well I'm going to sign off, prepare myself some lunch and then partake of it in the garden. I may even fool myself into thinking I could take some work outdoors later on (though I've tried that one before and end up taking a book out and reading that instead lol). Welllllll...I can always work when the sun goes down haha.
Have a great weekend folks
Px
And it's been a great week so far. The UK has been enjoying the rare sighting of the sun. Yes, even Manchester's constant rain has been put on hold. It's been so tranquil to sit in the garden and draw or listen to a play whilst sipping on smokey Earl Grey.
Trouble is, I haven't felt like sitting indoors, in my craft room playing and it was beginning to look as if I was going to have nothing to blog this week. However, I was up bright and early this morning and had already notched up a couple of hours worktime, so decided to drag out my stash and just spend a few minutes putting something together.
Almost everything is from Jodie Lee's Nature Collection, except for the burlap flower. I found this neat tutorial here. You need to scroll down to the last flower made, the Button-Eyed Daisy. I love how the burlap frays as you make it and you end up with these tattered strands. And I know I always say this but honestly it's really easy to make.
Right, well I'm going to sign off, prepare myself some lunch and then partake of it in the garden. I may even fool myself into thinking I could take some work outdoors later on (though I've tried that one before and end up taking a book out and reading that instead lol). Welllllll...I can always work when the sun goes down haha.
Have a great weekend folks
Px
Thursday, 17 May 2012
A Cheeky Little Tag
I have plenty of mojo at the moment, just without the free time in which to utilise it. However, to keep my hand in, I sat and spent an evening just painting backgrounds for tags. I had no plans or ideas, I just added layer after layer of paint, pens and ink until I had something interesting.
Admittedly, the tags have sat on my desk for a few days now, waiting for me to make something of them. So I took a short cut and made this tag from a saucy little image I had already previously coloured. Well, I say coloured but I actually mean just added shadows to. It's a digital image I bought from Stitchy Bear who have a delightfully cheeky selection amongst their collection of stamps. Much more to my taste than the cuter end of the scale. I bought a few for a workshop I attended a couple of weeks back on how to make the most out of promarkers.
I hacked into an old book, mixing up the titles of two chapter headings for the wording before outlining them with a white pen. To finish, I tore up a strip of washi tape, glued on some buttons and threaded wool through the eye. Thankfully, I resisted the urge to cover up the tag to the point where you wouldn't see the background anymore, which is my usual default lol.
I'm off to London for the weekend, so I'm hoping to indulge in a bit of shopping (Smokey Earl Grey Tea is top of my list, thanks to my friend Tim) as well as taking time out to open my sketchbook and scribble away. And yes I'll probably visit the V&A. Regular readers know I have to visit my favourite museum on almost every trip to the capital.
Hope you all have a wonderful creative weekend too.
Px
Admittedly, the tags have sat on my desk for a few days now, waiting for me to make something of them. So I took a short cut and made this tag from a saucy little image I had already previously coloured. Well, I say coloured but I actually mean just added shadows to. It's a digital image I bought from Stitchy Bear who have a delightfully cheeky selection amongst their collection of stamps. Much more to my taste than the cuter end of the scale. I bought a few for a workshop I attended a couple of weeks back on how to make the most out of promarkers.
I hacked into an old book, mixing up the titles of two chapter headings for the wording before outlining them with a white pen. To finish, I tore up a strip of washi tape, glued on some buttons and threaded wool through the eye. Thankfully, I resisted the urge to cover up the tag to the point where you wouldn't see the background anymore, which is my usual default lol.
I'm off to London for the weekend, so I'm hoping to indulge in a bit of shopping (Smokey Earl Grey Tea is top of my list, thanks to my friend Tim) as well as taking time out to open my sketchbook and scribble away. And yes I'll probably visit the V&A. Regular readers know I have to visit my favourite museum on almost every trip to the capital.
Hope you all have a wonderful creative weekend too.
Px
Friday, 27 April 2012
Nature Garden Tag
Apparently, I'm wrong. Yes, I know you don't hear me say that very often. It seems that when I wrote a few days ago that I was an "unofficial DT member" for The Gypsy Chick, I was giving out false information. I am, as you can understand, mortified by the error and will now correct myself. I am not an unofficial member. There I've said it, I hang my head in shame. I am in fact, an official DT member. Sorry to those I've mislead lol.
And someone else, whose creations I adore, has joined the team too. But my lips are tightly sealed (for now). We are both, needless to say, very lucky to be given the opportunity to play with such gorgeous vintage-style designs.
I still have heaps of goodies left over from Jodie's Nature Garden Collection from Prima and last night I felt the itch to go ahead and make a tag.
I used the Primrose paper from the A4 pad as the background to which I dabbed around the edges with white acrylic paint. I stamped the vintage fairy image onto a separate piece of paper, before cutting it out and attaching with 3D foam pads. I then decorated around the raised image with a variety of ephemera including this gorgeous ribbon, which has a delightful tattered edge to it when cut. Perfect for a shabby vintage design. Have to say, I can see myself stocking up on it. Finally, I finished the tag off with the chipboard word "inspired" and a beautiful metal trinket frame.
It's looking like another wet weekend back here, so it should be a good excuse to stay indoors and play in my craft room. Though I think Nick is eyeing up the framed pictures which have been stacked up waiting for us to hammer some nails into the walls and finally hang them up. If it was left up to me, they'd sit there for another twelve months lol. Me, I want to go crazy in the kitchen and bake up some goodies, if it's wet outside. I'll let you know who wins haha
Have yourselves a wonderful, creative weekend
Px
And someone else, whose creations I adore, has joined the team too. But my lips are tightly sealed (for now). We are both, needless to say, very lucky to be given the opportunity to play with such gorgeous vintage-style designs.
I still have heaps of goodies left over from Jodie's Nature Garden Collection from Prima and last night I felt the itch to go ahead and make a tag.
I used the Primrose paper from the A4 pad as the background to which I dabbed around the edges with white acrylic paint. I stamped the vintage fairy image onto a separate piece of paper, before cutting it out and attaching with 3D foam pads. I then decorated around the raised image with a variety of ephemera including this gorgeous ribbon, which has a delightful tattered edge to it when cut. Perfect for a shabby vintage design. Have to say, I can see myself stocking up on it. Finally, I finished the tag off with the chipboard word "inspired" and a beautiful metal trinket frame.
It's looking like another wet weekend back here, so it should be a good excuse to stay indoors and play in my craft room. Though I think Nick is eyeing up the framed pictures which have been stacked up waiting for us to hammer some nails into the walls and finally hang them up. If it was left up to me, they'd sit there for another twelve months lol. Me, I want to go crazy in the kitchen and bake up some goodies, if it's wet outside. I'll let you know who wins haha
Have yourselves a wonderful, creative weekend
Px
Thursday, 29 March 2012
Scrunchy Flower Tutorial
Here's the second of the two flower tutorials I produced as a pdf, which I have now brought over here. Well, it's nice to have them all together in one place.
The materials you need:
Plain Ivory Colour Card
Circle Dies: I’ve used Spellbinders Circles 23mm, 35mm and 48mm dia. i.e. the three smallest.
With the circle dies, cut out 1 large disc and 2 of each of the medium and small discs from the card. Spray with water to dampen.
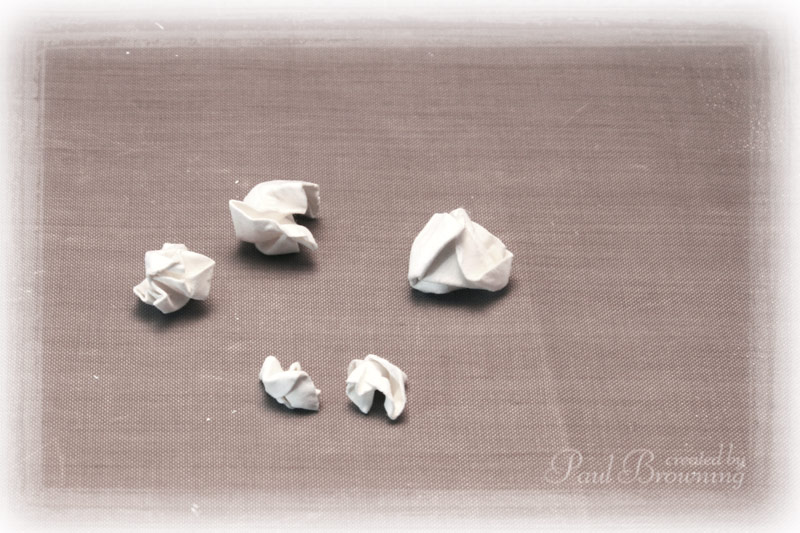
Scrunch up tight, each of the circles.
Unfurl them and lay back out on your craft sheet. Give them another spray of water to keep damp.
Cup your hand and press each disc into it with your finger to create a bowl shape. The card is easy to manipulate whist damp, so tweak and pinch the edges with your fingers until you’re happy with it’s look.
With the two smallest circles, Pinch them into tighter, trumpet-style shapes.
Leave the pieces until they are bone dry. Use a heat gun to quicken up the process.
Use pva glue or similar and layer the flower together. Largest on the bottom, followed by the medium two & top with the smallest ones. Yes, it really is that easy to make.
If you don’t have the Spellbinders circle dies, don’t rush out immediately to buy a set. I use them for convenience but you can easily handcut out rough circles from the card using just a pair of scissors. Also, if you do already own similar dies of a circular shape, why not try them out instead. The flower above on the left was created with a scalloped circle set and the one on the right using the Blossom Nesties.
Tattered Bloom Tutorial
Welcome to my first ever online flower tutorial. It's a tattered paper bloom which incorporates one of my favourite techniques of wetting and shaping card. Some of you will have seen this before in PDF format but I thought I'd bring it over here too.
So to begin. The materials you will need:
Card - Ivory, Dark blue, Light blue
Sun Shaped Punch
Dark Blue Ink Pad
From the light blue card, cut out a 5cm square and a 4cm square.
Start from middle of the top edge and tear to the middle of the left hand edge. Keep tearing to the middle of the bottom edge, right hand edge, back up to the top.
Do this with both squares and you will now have two rough shaped circles.
With a pencil, lightly draw a circle in the centre and five lines going out to the edge.
Using the pencil marks as guides, tear the card to make the petals.
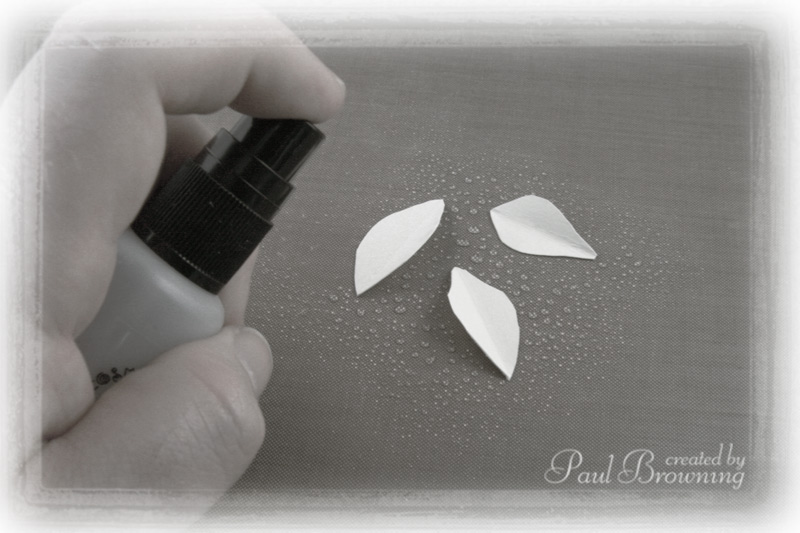
With a mister, spray the card pieces with water. You want it lightly wettenned, not soaked through.
Take the back of a paint brush and press into the middle of each flower shape.
Carefully fold the petals up around the brush’s handle.
Squeeze the card tight around the brush to form a tube like shape and carefully remove.
With a heat gun, give the shapes a blast, to dry them out.
Now, VERY carefully, unfurl the shapes. You need to feel your way around each petal, one by one. It’s easy to rush and tear a petal off. Once flattened out, dry out again with a heat gun
Take your ink pad and apply to the edges of the petals. I used a dark blue but any dark colour, say a brown, will be an excellent alternative.
With tweezers, curl the sides of the petals towards you. If you don’t have tweezers to hand, curl the petals around a cocktail stick.
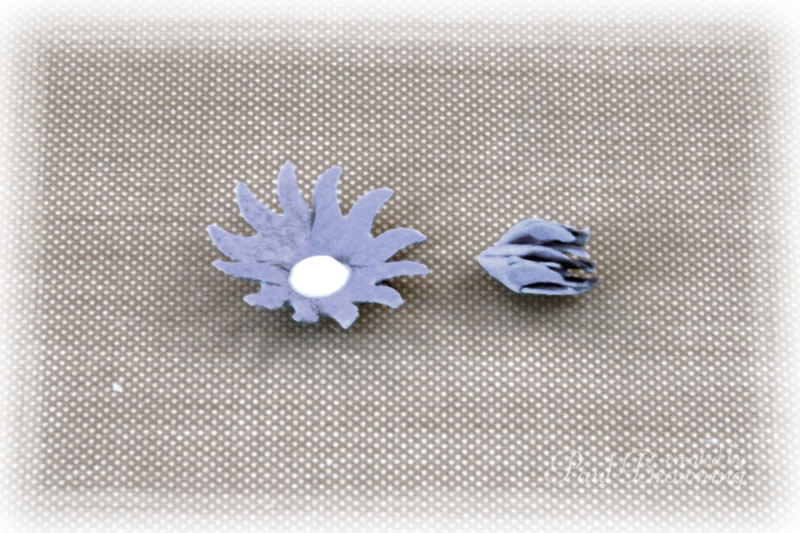
Punch four sun shapes (approx. 15mm dia) out of the darkest card. Take a mouse mat and press each shape into the mat with the back of the paint brush to form a bowl.
Scrunch up one shape as tightly as you can. Add to the centre of a second shape with a dab of glue. Scrunch the outer shape around the central bud.
Take this bud and glue to a third shape. Scrunch up.
Finally take this bud and glue to the fourth shape. Again scrunch up.
You now have the three components for your tattered bloom.
Place a dab of glue in the centre of the largest flower and arrange the smaller one on top. Try to offset the petals to give a rounder looking flower.
Add another dab of glue to the centre and attach the bud. And there you have it. You can stop there and use this flower in your projects as it is. However, if you’d like to add some leaves...
Take a strip of the ivory card (approx. 10cms x 5cms) and fold it in half along the length.
With scissors, cutting along the folded edge, make three rough half-leaf shapes. Open them up to see your results and if you wish, fold again and fine tune your leaf shapes.
When you are happy with your leaves. Spritz them with water.
Scrunch the leaves up into ball shapes and dry with a heat gun.
Unfurl the shapes and fold in half to revive the central crease in each leaf. As an optional extra, you can distress the edges carefully, with a craft knife, scissor edge or distressing tool.
Add a dab of glue to one end of each leaf and arrange behind the flower.
Once you’ve made your first tattered blooms and learnt the process, you can begin to produce them in batches, to have ready in your stash collection for future projects.
Subscribe to:
Posts (Atom)